Introduction
Containers have become a foundational tool in modern software development and deployment. Podman (short for pod manager) is an open source tool for developing, managing, and running containers. Developed by Red Hat engineers along with the open source community, Podman manages the entire container ecosystem using the libpod library. In this blog, we will go through the podman installation on AlmaLinux 9 and use it to run containers — including mounting custom volumes — which will help get you started with container management on your server.
Prerequisites
Before proceeding, make sure you have:
- An AlmaLinux 9 server
- A non-root user with sudo / root privileges
These are required so you can install packages and manage containers.
Steps for installation
Installing Podman
Podman is included in the AlmaLinux AppStream repository, so you can install it directly via :
sudo dnf install podmanOnce installed, verify the version:
podman versionYou can also get detailed info about the installation:
podman infoRunning Podman as a Non-root User
To run containers without relying on the root account, create a regular user:
sudo useradd -m -s /bin/bash podmanuser
sudo passwd podmanuser
Add that user to the wheel group to allow sudo rights:
sudo usermod -aG wheel podmanuserEnable lingering for the user so container processes can run even if the user is logged out:
sudo loginctl enable-linger podmanuserSwitch to the new user:
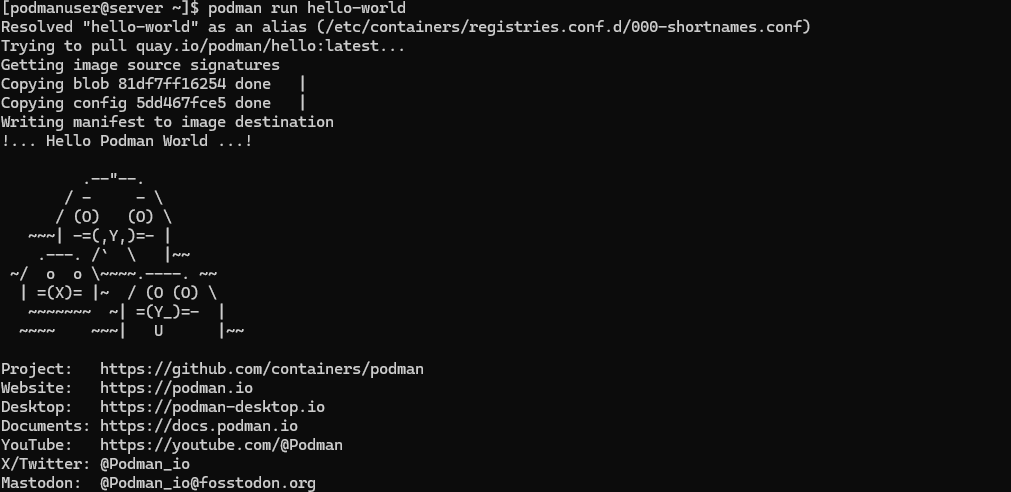
su - podmanuserRun a simple container to test:
podman run hello-worldIf successful, you get an output like;
Check all containers (running or exited):
podman ps -aIf everything is configured correctly, you should see the hello-world container with status Exited.

Finding Container Images
Podman can pull images from DockerHub, quay.io, Red Hat’s registries, and others. By default, these are configured in /etc/containers/registries.conf.
To search for images with a given term (e.g. httpd):
podman search httpdYou can limit results by:
podman search httpd --limit 3Downloading Images
Once you find an image you like, download it (i.e. “pull”) from the registry:
podman pull httpd:alpineAfter the pull completes, list your images:
podman imagesYou should now see images like hello-world and the httpd:alpine image.
Inspecting Images
To inspect a container image for metadata like default command, ports, working directory, etc.:
podman inspect docker.io/library/httpd:alpineYou can also format the output to show specific fields, e.g.:
podman inspect --format "size: {{.Size}}" docker.io/library/httpd:alpine
podman inspect --format "ports: {{.Config.ExposedPorts}}" docker.io/library/httpd:alpine
podman inspect --format "workdir: {{.Config.WorkingDir}}" docker.io/library/httpd:alpine
Running Container
To start a container (detached, mapping ports, naming it, auto‑removing on stop):
podman run -it --rm -d -p 8080:80 --name httpd docker.io/library/httpd:alpineTo list running containers:
podman psYou can test by using curl (replace with your server’s address):
curl http://<Your_server_IP>:8080/You can also point a browser to http://<server-ip>:8080/ and expect to see the container’s default page.\
Checking Logs of a Container
To view all logs from the httpd container:
podman logs httpdTo limit the log output to, say, the last 20 lines:
podman logs --tail 20 httpdStopping a Container
To stop the httpd container:
podman stop httpdThen check active/exited containers:
podman ps
podman ps -a
Because the container was run with –rm, it will be automatically removed upon stopping.
Running Container with Custom Volume
In this part, you will mount a directory from the host into the container:
Create a directory in the home of user podmanuser, and an index.html file inside:
mkdir -p ~/data/
nano ~/data/index.html
Add the following HTML content to index.html:
<!DOCTYPE html>
<html lang="en">
<head>
    <meta charset="UTF-8">
    <title>Hello from Podman</title>
    <style>
        body {
            font-family: Arial, sans-serif;
            text-align: center;
            padding-top: 100px;
            background-color: #ffffff;
   color: #000000;
        }

        h1 {
            font-size: 2em;
            font-weight: bold;
        }

        p {
            font-size: 1em;
            color: #333333;
        }
    </style>
</head>
<body>
    <h1>Hello from Podman!</h1>
    <p>This HTML page is served from a container using Podman.</p>
</body>
</html>
Save and close the file.
Run a new container with the host data directory mounted into the container’s document root:
podman run --privileged=true -it --rm -d -p 8080:80 --name httpd -v ~/data:/usr/local/apache2/htdocs docker.io/library/httpd:alpineNote: The –privileged=true flag is used here for testing; the container still runs under user podmanuser, not root.
Verify that the container is running:
podman psUse curl (or a browser) to check that your custom HTML page is served:
curl http://<Your_server_IP>:8080/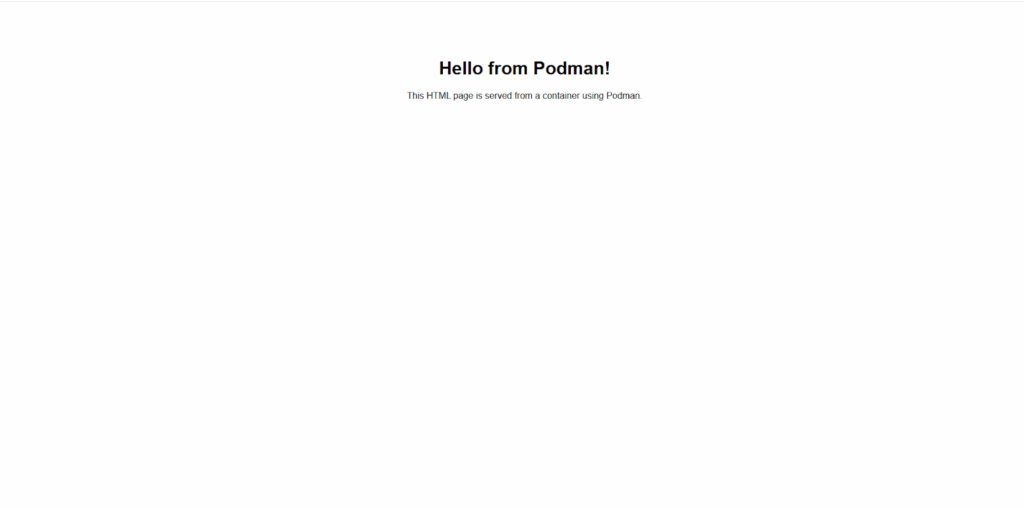
You should see the contents of the index.html you created earlier being served by the container.
Conclusion
You have now got an idea on the installation and basic usage of Podman on AlmaLinux 9. You learned how to:
- Install Podman from the default repositories
- Use Podman as a non-root user
- Search, pull, inspect, run, log, and stop containers
- Mount a host directory as a volume into a container
Looking for expert help with podman installation on AlmaLinux 9? Our 24/7 DevOps Support Services ensure fast setup, reliable performance, and seamless container management. Contact us today to get started!
