I have mounted a new disk /backup2 to the backup server 10.xxx.xxx.110 in order store the backups from the live server 103.xxx.xxx.120 which is a cPanel server.
The backups will be currently kept on a functional server. To move the backups to the backup server’s /backup2 mount, we need to configure the backups.
Let’s look at how to set up the backup configuration:
Setting up Backup Configuration :
Firstly, ensure that the disk is correctly mounted in the backup server ;
#df -h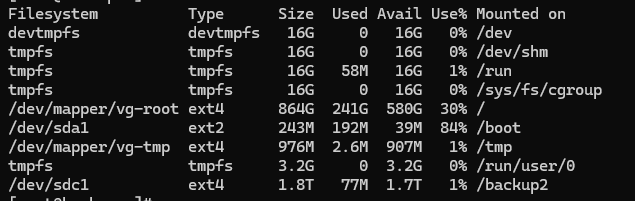
The server has correctly mounted the drive/backup2.
We can now set up the backup to the /backup2 drive.
To do this, create a new user called “backup_user” with the home directory set to /backup2/. You can use the useradd command with the -m option to create the user and automatically generate the home directory. Here’s how you can do it:
#useradd -m -d /backup2/backup_user backup_user.
Running this command will create the user “backup_user”, with the home directory set to /backup2/backup_user.
Now we can configure additional backup destination in live server’s WHM:
Log in to the WHM dashboard and type Backup Configuration into the search field.
An option for multiple backup destinations should be available in the Backup Configuration interface. Click on Create New Destination.
Enter the below information in the form that appears ;
Backup Destination Type: Select the “custom” type
Destination Name: Enter the name as you wish.
Backup Directory: Enter the path to the backup destination. Here I’m using the directory name as ‘backups’. The backups will be stored in /backup2/backup_user/backups.
Remote Host: Enter the backup server’s ip address. (for me, it’s 10.xxx.xxx.110)
Port: The ssh port that the system uses to communicate with the remote server
Remote account username: Provide the remote user account name. Here i’m using the user ‘backup_user’.
Authentication Type: The authentication type which the system use to connect to remote server.
Timeout: The number of seconds that the system will wait for a response from the remote server.
Save Configuration: After filling out the necessary details, click on the “Save” or “Add Destination” button to save your configuration.
After saving, cPanel may undergo a verification step to ensure access to the specified backup destination. Upon completion of the validation process, the backup can be enabled.
By following these steps, you will be able to configure that the additional backup destination to a custom drive in cPanel. However, backups will be stored in the directory associated with the user you’ve created, ensuring their proper storage and accessibility.
Our Support Team is available to help if you encounter any issues or errors.